Design My Kitchen for High-End Cabinets
We know that undertaking a design project and learning how to build kitchen cabinets can be both exciting and intimidating. Luckily, we’ll build you the beautiful, long lasting high-end kitchen cabinets you’ve always wanted; you just need to measure and plan appropriately. Whether you are remodeling an existing space or starting from scratch, let us show you what to do and where to start. Use this step-by-step Planning Page to start designing your perfect space. When you are finished, bring your plan to one of our Kitchen Design Professionals, and you will soon be on your way to having the space you have always dreamed of, with the best kitchen cabinets you’ll find anywhere, along with our wonderful, everyday low prices.
Step 1: Measure Your Kitchen Space
A good kitchen design begins with having accurate measurements. You will first want to decide what you need, what you want, and what existing items you would like to incorporate into your new kitchen. By drawing a preliminary room outline and floor plan, you will help others understand your ideas. Don’t worry, your drawings don’t have to be works of art–just clear, simple sketches.
Supplies You Will Need:
- 25′ Retractable Steel Tape Measure
- Pencil (preferably colored)
- Eraser
- Note Pad and Clipboard
- Small Step Ladder (if possible)
How to Measure Your Kitchen
Note: All measurements should be in inches–not feet and inches.
Walls
Start in one corner and measure along the wall approximately 36″ from the floor. Measure the wall until you reach a stopping point, whether it is from a break in the wall, an obstruction, or an opening. If it is a window or a door, you will want to measure all the way across the window or door, from outside of trim to outside of trim. You will also want to measure the width of the trim and note it on your drawing. Continue on to the next break, obstruction, or opening. If there is none, continue to the corner.
You will want to continue this process all the way around the room. After you have measured the individual spaces on each wall, take a wall-to-wall measurement. This will help you double check your measurements.
Windows & Doors
After you have measured all of the walls, you will need to get additional information for the doors and windows. You will need to measure the overall door height, including trim, as well as the door swing. You will also need to measure the overall window height including trim, as well as the distance from the floor to the window sill. It is often helpful to make a chart and label each window A, B, C, as well as each door. You can record your measurements in the chart.
Ceiling & Soffits
Your next step will be to measure the ceiling height of your kitchen. You will want to take the measurement in a few different areas to judge how level the floor is. If your kitchen currently has soffits, you will also need to measure them. You will want to measure the height as well as the distance they jut out from the wall.
Measuring Guide
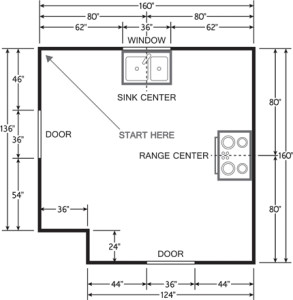
Our Measuring Guide will help you to begin scoping your project. It will also help us to provide you with a preliminary estimate. KBC will always professionally measure your space before finalizing your design and ordering your cabinetry, so remember the Measuring Guide is for estimate purposes only.
If you’re feeling creative, use our Printable Grid Paper to draw out your floor plan before coming into KBC. It will even further help your Design Professional with the preliminary estimate!
CLICK HERE TO DOWNLOAD PRINTABLE GRID PAPER
Step 2: Understand the Kitchen Work Triangle
While working in a kitchen, a cook naturally moves between three places where different tasks are performed. The path that you make when moving from the refrigerator, to the sink, to the cooktop or oven to prepare a meal is the Work Triangle. This triangle is the heart of your kitchen design.
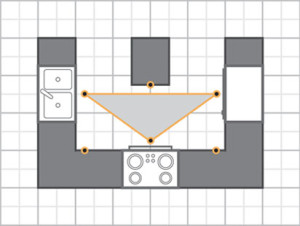
In the next step, you will be selecting a kitchen layout. Carefully review the five different layouts to identify which layout is most similar to your current kitchen. Make sure to focus on the Work Triangle while looking at each layout as you may find a floor plan that you prefer over your own.
Additionally, keep in mind that you will need a place for food preparation. The most efficient place for preparing your food is within your Work Triangle–whether it’s a countertop, on an island, or between the cooking and food storage zones.
Step 3: Choose the Ideal Layout
Once you have measured and drawn out your floor plan, you can start to layout your ideal floor plan for your new kitchen. Your first step in doing this is to understand the work triangle. Your basic work triangle is an imaginary line drawn between your kitchens three primary work areas: food storage (refrigerator), food preparation (stove), and clean up (sink). Try to keep your work triangle to a size of 26″ or less–the sum of the three legs of the work triangle.
L-Shaped Kitchen
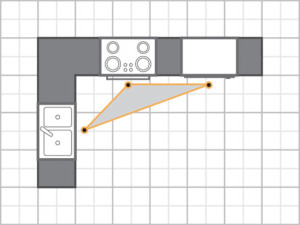
The L-shaped kitchen is one of the most popular styles because it is very flexible. Its work triangle is uninterrupted by traffic, and there is ample room for appliances. It is ideal for adding a dining area or an island.
U-Shaped Kitchen
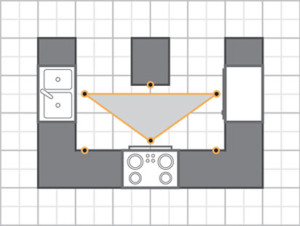
A U-shaped kitchen surrounds you on all three sides with storage, countertops, and appliances. This kitchen is a very popular layout because of the compact work triangle it creates. It often contains generous counter space and helps provide an efficient work flow.
G-Shaped Kitchen
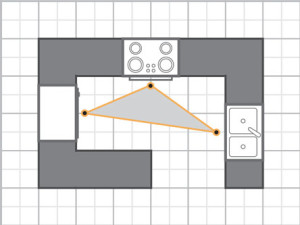
The G-shaped kitchen is similar to the U-shaped kitchen in that you still have the same amount of countertop space and storage options that surround the cook on three sides. What the G-shape layout adds is a peninsula or partial fourth wall of additional cabinets.
Galley Kitchen
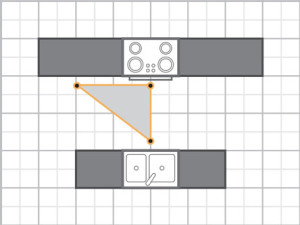
The galley kitchen is ideal for small kitchens and is incredibly efficient. People walking through the kitchen can get in the cooks way, however; and counters and storage can be limited.
Single-Wall Kitchen
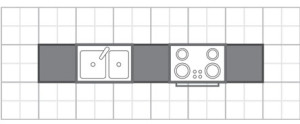
The single-wall kitchen is ideal for apartments. It provides an open and airy layout with all three work areas being located on one wall.
